Setup Login Page – Part 3

In this section, we will look at how to setup our PHP pages that will receive our POST requests through AngularJS.

We will want to create 5 files, “access.php” will contain our functions to contact individual PHP pages for one of 4 specific purposes: login, logout, register, and status. The next file “login.php” will return a JSON of the result from logging in, “register.php” will return a JSON of the result from registering and the verification code, “config.php” to hold our database connection information, and finally “status.php” will return a JSON of the login status for the current session.

Let’s setup our JSON returning pages first.

“login.php”: This page will decode the POST (in JSON format) sent by the login page through AngularJS containing the username and password. It will then convert the result from the MySQL call into a JSON format which will be displayed on this page.

<?php	
	require_once "access.php";
	$postdata = file_get_contents("php://input");
	$request = json_decode($postdata);
	if ($request->login)
	{
		Session::Login($request->username,$request->password);
		if ($_SESSION['isLogged'] > 0)
		{
			$_SESSION['email'] = $request->username;
			$_SESSION['password'] = $request->password;
		}
	}
	else
	{
		Session::Logout();
	}
	$result = array('isLogged' => $_SESSION['isLogged']);
	header('Content-Type: application/json');
	echo json_encode($result);
?>

“register.php”: This page will decode the POST (in JSON format) sent by the registration page through AngularJS containing the username and password to be added to the MySQL user table. The page will then display the verification link and the result of the attempt in JSON format. If the attempt fails, the verification link in the JSON will be empty and can be ignored.

<?php	
	require_once "access.php";
	$postdata = file_get_contents("php://input");
	$request = json_decode($postdata);
	$user = $request->username;
	$pass = $request->password;
	$result = Session::Register($user,$pass);
	$txt = "";
	if ($result[0] > 0)
	{
		$url = "http://localhost";
		$txt = $url . "/verify.php?user=" . $user . "&code=" . $result[1];
	}
	$json = json_encode(array('url' => $txt, 'registered' => $result[0]));
	header('Content-Type: application/json');
	echo $json;
?>

“status.php”: This will simply return the session value of our login status based on the stored email and password in the form of a JSON. This is so we can set our AngularJS variable to correctly reflect that status in our view when we load new pages. This is NOT used for actual authentication checks, we do not want to handle security features from the client side through AngularJS.

<?php	
	$result = array('isLogged' => $_SESSION['isLogged']);
	header('Content-Type: application/json');
	echo json_encode($result);
?>

“access.php”: This script will contain all of our functions that are called in the previous 3 pages. Here we will handle database connections, calling procedures and retrieving the results. We will store the result of our login status within a $_SESSION variable, which has a lifetime by default of 24 minutes (this can be changed within the php.ini).

<?php
	class Session
	{
		public static function GetSession()
		{
			if (!session_id())
				session_start();
		}
		
		public static function SetLoginState($state)
		{
			Session::GetSession();
			$_SESSION['isLogged'] = $state;
		}
		
		public static function CheckAccess()
		{
			Session::GetSession();
			
			if (!isset($_SESSION['email']))
				$_SESSION['email'] = '';
			if (!isset($_SESSION['password']))
				$_SESSION['password'] = '';
				
			$result = Session::Login($_SESSION['email'], $_SESSION['password']);
			if ($result <= 0)
			{
				header('Location: noaccess.php');
				die();
			}
		}
		
		public static function GetPDO()
		{
			require_once 'config.php';
			$pdo = new PDO("mysql:host=$dbhost;dbname=$dbname",$dbuser,$dbpw);
			return $pdo;		
		}
		
		public static function Logout()
		{
			Session::SetLoginState(0);
			$_SESSION['email'] = '';
			$_SESSION['password'] = '';
		}
		
		public static function Login($email, $password)
		{
			try
			{
				if ($email !== "" && $password !== "")
				{
					$pdo = Session::GetPDO();
					$sql = 'CALL Login(:user,:pass,@result);';
					$sp = $pdo->prepare($sql);
					$sp->bindParam(':user',$email,PDO::PARAM_STR,256);
					$sp->bindParam(':pass',$password,PDO::PARAM_STR,256);
					$sp->execute();
					$sp->closeCursor();
					$row = $pdo->query('SELECT @result AS result')->fetch(PDO::FETCH_ASSOC);
					Session::SetLoginState($row['result']);
				}
				else
				{
					Session::SetLoginState(-1);
				}
			}
			catch (PDOException $e)
			{
				Session::SetLoginState(-1);
				die();
			}
		}
		
		public static function Activate($email, $vcode)
		{
			try
			{
				if ($email !== "" && $vcode !== "")
				{
					$pdo = Session::GetPDO();
					$sql = 'CALL Activate(:user,:vcode,@result)';
					$sp = $pdo->prepare($sql);
					$sp->bindParam(':user',$email,PDO::PARAM_STR,256);
					$sp->bindParam(':vcode',$vcode,PDO::PARAM_STR,256);
					$sp->execute();
					$sp->closeCursor();
					$row = $pdo->query('SELECT @result AS result')->fetch(PDO::FETCH_ASSOC);
					return $row['result'];
				}
				else
				{
					return -1;
				}
			}
			catch (PDOException $e)
			{
				return -1;
				die();
			}
		}
		
		public static function Register($email, $password)
		{
			try
			{
				if ($email !== "" && $password !== "")
				{
					$pdo = Session::GetPDO();
					$sql = 'CALL Register(:user,:pass,@result,@vcode)';
					$sp = $pdo->prepare($sql);
					$sp->bindParam(':user',$email,PDO::PARAM_STR,256);
					$sp->bindParam(':pass',$password,PDO::PARAM_STR,256);
					$sp->execute();
					$sp->closeCursor();
					$row = $pdo->query('SELECT @result AS result, @vcode AS vcode')->fetch(PDO::FETCH_ASSOC);
					return array($row['result'],$row['vcode']);
				}
				else
				{
					return array(-1,"");
				}
			}
			catch (PDOException $e)
			{
				return array(-1,"");
				die();
			}
		}
	}
?>

The main thing to understand here is how we are opening a connection between the PHP script and the MySQL server using the PDO call. We create another file called “config.php” that contains the variables we need to establish the database connection. Simply change the values of the variables within the file to fit your database.

<?php
	$dbhost = 'localhost';
	$dbname = 'webapp';
	$dbuser = 'root';
	$dbpw = '';
?>

Since we’re using $_SESSION it’s important to open your php.ini file, and enable the following. We don’t want a nefarious user to attempt a session fixation attack; the gist of which is a third party will get a user to log into your site using a predetermined session id, thus allowing the third party to access the site as the user. If we refuse non-server created session ids we take a step to prevent these attacks. For our purposes, we store the username and password in session variables. We authenticate access to specific pages through the use of these variables.

session.use_strict_mode = 1

The final step is setting up the frontend using PHP and AngularJS.
Setup Login Page – Part 2

In this part, we will go over the database model and the procedures we will create to populate our tables. Keep in mind, we are using MySQL for this tutorial.

Our table will be one of users, containing our relevant user security information. Each entry will be composed of an email, a password, a salt, a verification code, and an active flag.

The first thing we want to do is understand what columns should be indexed, clustered and our primary key. To do this we need to consider what the primary operation on this table will be. For our purposes we will be doing the insertions for new accounts, but we will also be performing selections when checking for passwords, existing accounts, and account activation. With this in mind, we will form a primary key on the email column, with the understanding that we want faster searches. There will only be distinct email values in this table which make it a good candidate key.

First we will establish our table.

CREATE SCHEMA webapp;

CREATE TABLE webapp.users
(
	email VARCHAR(256) NOT NULL,
	pw VARCHAR(256) NOT NULL,
	salt VARCHAR(256) NOT NULL,
	vcode VARCHAR(256) NOT NULL,
	active BIT DEFAULT 0,
	PRIMARY KEY (email)
);

The next thing we will want to do is go over our stored procedures. These will be accessed by our PHP pages.

Our first procedure will be to register an account. It will take in an email variable, a password, and output a result allowing us to determine whether the registration was successful or not.

The way our register procedure essentially works is we take in the regular password string, we generate a random salt using SHA2 hashing algorithm with random input, we concatenate the two, hash the result of that with SHA2 again, and store the results of that as the password and the salt in the table. This way if our data is compromised, the password isn’t human readable. We also generate a random SHA2 hash for our activation code which is also stored in the table.

DELIMITER $$
CREATE PROCEDURE webapp.DoesExist(IN email VARCHAR(256), OUT result INT)
BEGIN
	SET result = -1;
	IF (email != '') THEN
		SELECT COUNT(*) INTO result FROM webapp.users AS u WHERE u.email = email; 
	END IF;
END $$
DELIMITER ;

DELIMITER $$
CREATE PROCEDURE webapp.Register(IN email VARCHAR(256), IN pw VARCHAR(256), OUT result INT, OUT vcode VARCHAR(256))
BEGIN
	SET vcode = '';
	SET result = -1;
	IF (email != '' AND pw != '') THEN
		SET @exist = 0;
		CALL webapp.DoesExist(email, @exist);
		IF (@exist <= 0) THEN
			SET @salt = SHA2(RAND(),0);
			SET @hashpw = SHA2(concat(pw, @salt),0);
			SET vcode = SHA2(RAND(),0);
			INSERT INTO webapp.users (email, pw, salt, vcode) VALUES (email, @hashpw, @salt, vcode);
			SET result = 1;
		END IF;
	END IF;
END $$
DELIMITER ;

The next thing we want to do is create our activate account procedure. If the email and verification code match, then the value of the active column is set to 1 to confirm the update. If the result returned is greater than 0, the account was found and the code matched.

DELIMITER $$
CREATE PROCEDURE webapp.Activate(IN email VARCHAR(256), IN vcode VARCHAR(256), OUT result INT)
BEGIN
	SET result = -1;
	IF (email != '') THEN
		SELECT COUNT(*) INTO @result FROM webapp.users AS u WHERE u.email = email AND u.vcode = vcode;
		IF (result > 0) THEN
			UPDATE webapp.users AS u SET u.active = 1 WHERE u.email = email;
		END IF;
	END IF;
END $$
DELIMITER ;

Finally, we want to create our login procedure which will return a value greater than 0 when a successful login occurs.

DELIMITER $$
CREATE PROCEDURE webapp.Login(IN email VARCHAR(256), IN pw VARCHAR(256), OUT result INT)
BEGIN
	SET result = -1;
	IF (email != '' AND pw != '') THEN
		SET @exist = -1;
		CALL webapp.DoesExist(email, @exist);
		IF (@exist > 0) THEN
			SET @salt = '';
			SELECT u.salt INTO @salt FROM webapp.users AS u WHERE u.email = email;
			SET @hashpw = SHA2(concat(pw, @salt),0);
			SELECT COUNT(*) INTO result FROM webapp.users AS u WHERE u.email = email AND u.pw = @hashpw AND u.active = 1;
            IF (result < 1) THEN
				SET result = -2;
            END IF;
		END IF;
	END IF;
END $$
DELIMITER ;

That’s our database setup, the next step will be to create our PHP pages. One more important note, when you are setting up a user to access this database for the external users make sure you restrict their table access to only the tables you want the to read, and only allow them the ability to execute calls instead of the freedom to call whatever queries they wish on the table. It’s important to think about security when it comes to data like this.

Setup Login Page – Part 1

This is going to go over one way to setup a login page. Of course, like most things, there are many ways to approach this. This implementation will use a combination of PHP, AngularJS, and MySQL.

In this part, I’ll describe the design we will be using.

Essentially, we will have 3 pages: a login page, a register page, and a locked page.

These pages will have forms built into them using AngularJS to take care of client side validation of input values. The forms will then POST to PHP pages which will then contact our MySQL server with a CALL to one of three stored procedures: Register, Login, and Activate. The PHP page will then get the result from these stored procedures, store them in a $_SESSION variable and then pass that data on in a JSON object which the calling form page will then decode.

The typical use cases go like this.

Login: The user will land on the login page initially. They will enter a username and password. If the username and password are in the user database, the user will be logged in with feedback telling them as much. If not, the user will receive feedback telling them that the login failed.

Locked: The user will attempt to access the locked page. If they are logged in during current session, show the page. If they aren’t logged in, redirect them to a page that states they need to login to access the page.

Register: The user will enter in a username, a password and confirm the password. Feedback will tell them if the passwords match. The form will not allow the fields to be empty upon submission and alert the user if this is the case. Upon submission the user will receive feedback saying that the account could or could not be created. If created, the user will receive a link that needs to be clicked to verify the account for use.

That is the general idea behind this small tutorial. I will post the full source code at the end of the final post.

Basic PHP Templates

I’ve been doing some web design recently and found PHP templates to be a really useful feature. One of my favourite things about PHP is the fact that all the code is compiled on the server before the HTML is sent to the reader. They also seem to be more responsive than using jQuery to load an .html file into a DOM object when creating templates, although if you’re creating single page applications that’s obviously not a problem. There are other ways to do this, but I just want to go over the way I handle PHP templates.

First we just create a ‘template.php’ file that will be used in other .php files around the site. This file will contain our templates for our headers, footers, and navigation. Of course you can change this to fit your own needs.

<?php
	class Template
	{
		public static function Header()
		{
			echo
			'<script src="/java.js"></script>
			<link rel="stylesheet" href="/bootstrap.css">';
		}
		
		public static function Footer()
		{
			echo '<div>Footer is here...</div>';
		}

		public static function Navigation()
		{
			echo '<div><a href="#">link 1</a></div>';
		}
	}
?>

Then we just call it like this in whatever .php file we are expecting to use these templates in.

<?php require_once "template.php"; ?>
<html>
	<head>
		<?php Template::Header(); ?>
	</head>
	<body>
		<?php Template::Navigation(); ?>
		<?php Template::Footer(); ?>
	</body>
</html>

That’s it! Obviously you can customize this however you need, but that’s the gist of it.

Busy Busy Busy!

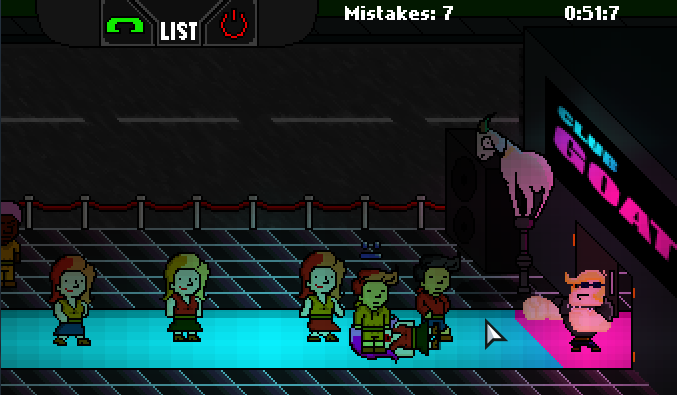
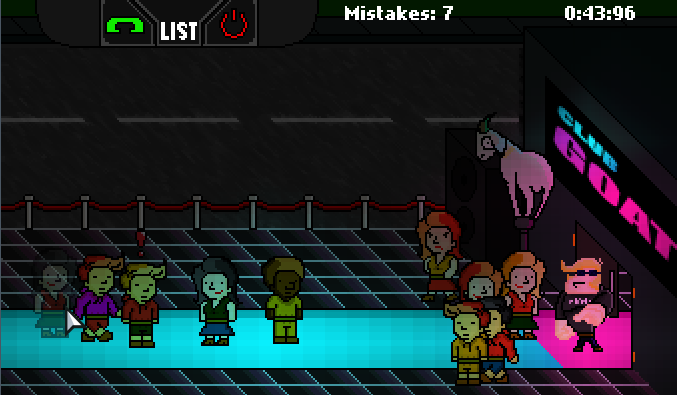
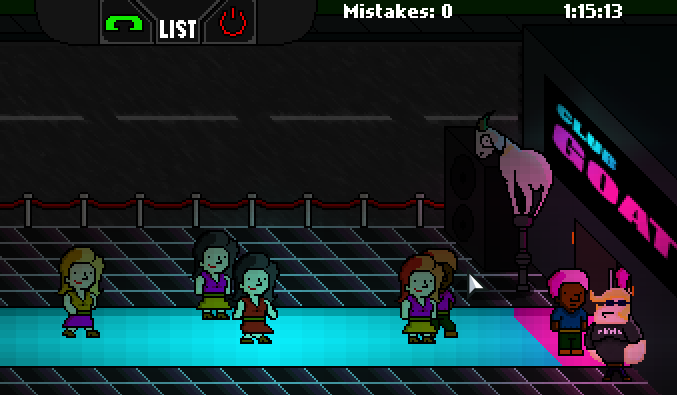
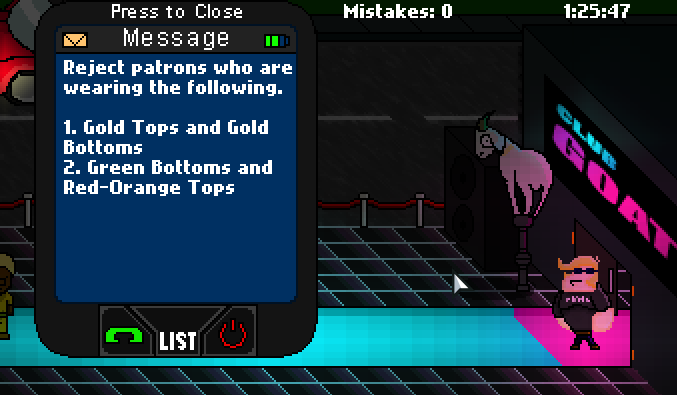
I haven’t forgotten about the tutorials. I’m really sorry I haven’t been able to do any for a while, I just started a new a job in the past week and have been busy as a bee.  I’ll be doing the next part of the UDK tutorial this weekend, so that will be there. However, I was also at the Toronto Game Jam (TOJAM) recently and I have to say that was pretty much one of the most awesome and productive times I’ve had, you know, making a game in 3 days. We (me and Nathan Mainville) are in the process of doing massive overhauls to some systems, addition of content, and touch compatibility, but its coming. We built this in approximately 2-3 days, using Flixel, and I have to say, for my first experience with Flixel, I’m fairly happy with the result.

Screen capture of the phone with the list of who to reject from the club.
A screen capture of the bouncer punching someone who just tried to run into the club even though they were told to leave.
Screen capture of a bunch of customers being turned away from the club.
Screen capture of the bouncer letting people through and into the club.


Creating a Custom Pawn

The next thing we will do is create a custom pawn. To do this we will take note of a few things, and highlight some structuring for future additions we may want to include in our game. These design considerations will make it easier for us to adapt the classes to fit our needs for the game we want to design, without requiring any major overhauls.

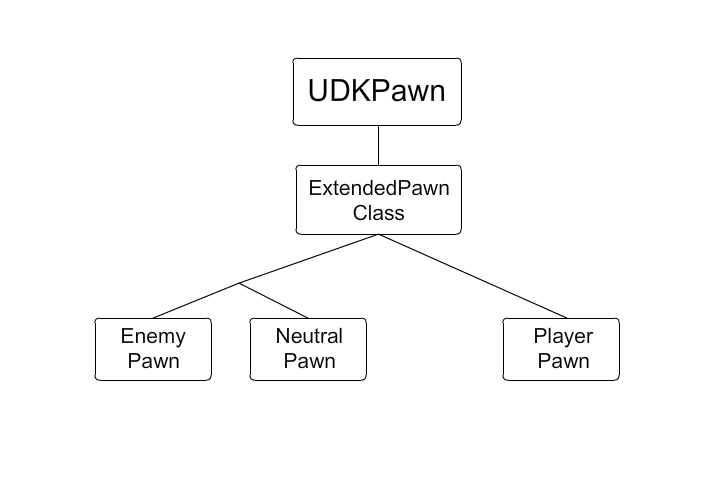
A basic pawn hierarchy to give insight into what someone could do with their pawn structure.

So basically what we want to do here is setup our pawn class to extend from the UDKPawn class. This will give the pawn most of the basic functionality we need for the pawn to interact with the other systems embedded in the framework of the unreal engine. With this  newly created pawn class we will include functionality that we expect will be necessary to many other pawns we will derive from this class, this can include properties of characters in an RPG for example. We can expect that these will be present in all other character entities such, possibly described by the tuple Character(Name, TeamId, BaseHealth, BaseDamage, bCanDie) just to give you an idea of the types of things you might find at this level of abstraction. When we dive into a more specific class, like one used to describe the Neutral Pawn class, we might find more functionality related to neutral pawns only, such as  flags identifying neutral NPCs as possible targets for conversation (bCanTalk). Within these pawn classes, we can describe which types of meshes, animation sets, physics assets, and materials we want to apply. In fact, we can branch the abstraction of the extended UDKPawn class into characters and game objects (however, extending from UDKPawn may be too much extra functionality that is unnecessary for most game objects, you could try extending from the Actor class, which is a class that UDKPawn extends, a layer of abstraction below UDKPawn).

Creating the class

Now that we’ve covered the rough idea of what we are expecting to accomplish, we can extend the class. Create a new UnrealScript file much like we did in the previous tutorial, but this time lets call the file YourAcronym_Pawn and replace the “extends Object” portion of the class definition with “extends UDKPawn abstract”. We add abstract to the end of the class because we do not expect to create any instances of this class, we only wish to use it as the abstraction of all future pawns.

If we wish to include variables that are going to be common throughout the pawns we expect to extend from this class, we can add them at the top of the class. It is important to comment your code for future reference, especially if you are working with more than one person. From this point on, we will assume we are making an RPG using UDK. If I wanted to make BaseHealth and PawnName common throughout all pawns (assuming they are some type of character in game) I can add the variables like so, resulting in the whole class looking like this:

class SG_Pawn extends UDKPawn abstract;

var( Name ) string PawnName;
var( BaseHealth ) float BaseHealth;

DefaultProperties
{
}

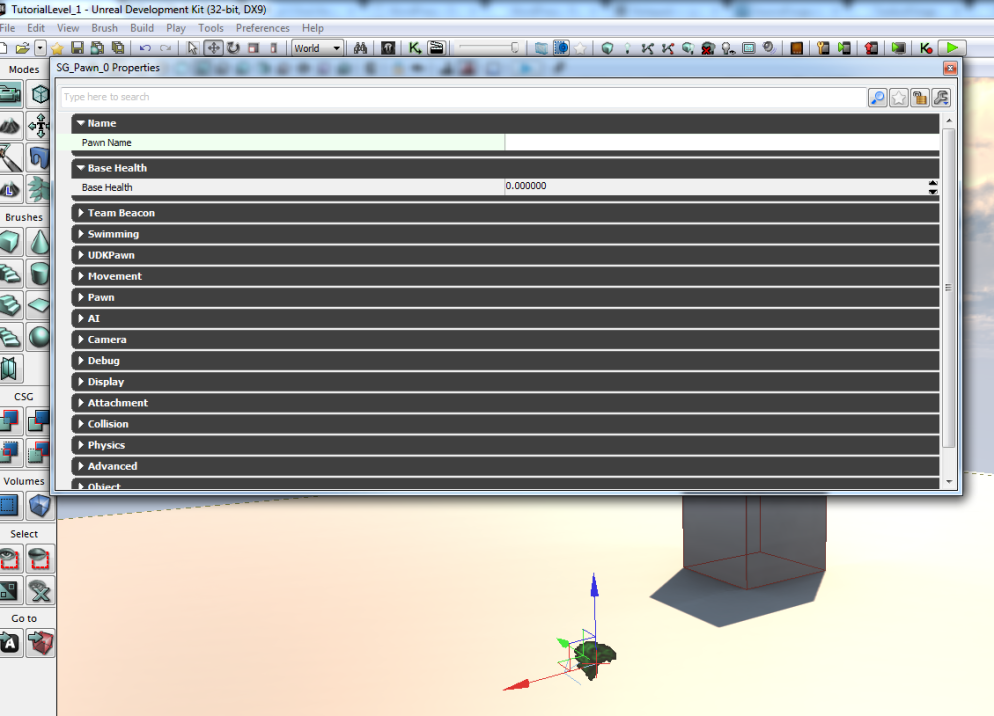
This is how we declare variables in UnrealScript, and by including the parentheses after the var keyword, we have set that variable to be accessible from within the editor itself. Whatever you want to categorize the variables as within the editor’s property window is declared between the parentheses. In this case, PawnName will be categorized under Name, and BaseHealth will be categorized under Base Health. We can see what it looks like in the editor here:

SS1

It may also be beneficial to include an NPCId variable so that the pawns can be tracked, lets say if you wanted to track deaths of a type of NPC for a quest. By tracking an ID rather than a Name, you can have differently named NPCs belonging to the same classification of NPC, or you could create an array which would hold the types of NPCIds that belong to a grouping of NPCs, so that counters could be incremented whenever an NPC with a specific id were to die. These are some possible ideas, but for now we will keep things simple. We are finished with the abstract class, but we now need to create the place-able class.

Create a new UnrealScript file, and call it <YourAcronym>_PlayerPawn, this will be our player pawn in our game. Once we have it opened, we replace the class declaration with the following line:

class SG_PlayerPawn extends SG_Pawn placeable;

This allows us to extend our previously created abstract class, and make this PlayerPawn class placeable in the editor, meaning we can access it from the Content Manager’s actor classes tab and place it directly onto the map. The next thing we want to do is change the default properties of the pawn to include the meshes and animsets we want to use for this pawn. To do this we add the following to our DefaultProperties section:

DefaultProperties
{
	Begin Object Class=SkeletalMeshComponent Name=NPCMesh0
		SkeletalMesh=SkeletalMesh'UPK_Tutorial.Armature'
		PhysicsAsset=PhysicsAsset''
		AnimSets(0)=AnimSet'UPK_Tutorial.AnimSet'
		AnimtreeTemplate=AnimTree'UPK_Tutorial.AnimTree'
	End Object
	NPCMesh=NPCMesh0
	Mesh=NPCMesh0
	Components.Add(NPCMesh0)
}

At the moment, we don’t have any skeletal meshes, physics assets, animsets, or animtrees. What we can do though, is import packages into our content browser, allowing us to have meshes, etc. Here I have provided a very basic skeletal mesh with basic rigging included, it is located in the Tutorial folder of the subversion root:

https://subversion.assembla.com/svn/mclellskblog/

You will just need to copy the UPK_Tutorial.upk file and place it in your UDK//UDKGame/Content//Packages folder, then when you launch the editor, it should appear in the content manager.

Once you’ve done that, you have basically completed the PlayerPawn class. However, as you can tell, there is not much to it. There are many interesting functions and events to acquaint yourself with if you plan on expanding the functionality of the class, but we’ll get to that later. For now, we will move onto setting up a PlayerController.

Creating a New Game Mode

Development Environment

First of all, I’d like to start by mentioning the different options you have here when dealing with Unrealscript. You can choose to use pretty much any IDE you want that can support the language, I suggest that notepad++ is a good one to use if you aren’t sure. If you are looking for the actual language definition files there is one available for Notepad++ at the following location (courtesy of Mr Evil):

http://mrevil.pwp.blueyonder.co.uk/temp/UnrealScript.zip

There is also one available for people who wish to use Visual Studio 2008 or higher, the definition pack is called nFringe, however I believe there is a license you need if you wish to use it for commercial purposes (its very well done though, and is moderately priced for independent developers ~$350 for a year license, however you can’t really beat free now can you…):

http://wiki.pixelminegames.com/index.php?title=Tools:nFringe

I’ll be using nFringe and Visual Studio because of how complete it is, and its free to use as long as its non-commercial. Once you want to turn what you have into something that can be purchased, just get a license. Now that we are on track to code, lets start with some coding. We will be taking a look at setting up a new game mode.

Creating the Game Mode

So basically the way the unreal engine handles a game is like so, every game is composed of a set of levels (or worlds), and these levels can have multiple rule sets applied to them, these are contained in extensions of the GameInfo class. The problem with unreal is that the information stored in these classes (of which most thing are derived from) do not persist across levels, so unless you implement something called level streaming you will not be able to maintain that information from one level to the next. This can be a problem if you are planning on making an RPG since the state of the character and the events occurred in the realm of the game are integral to determining what options are available to the player in the form of future events, conversations and encounters. What we can do is implement a way to serialize the data, allowing us to save and load the state of the game in order to keep information across levels, but we will get to that later.

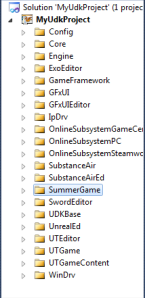
Assuming you’ve followed along so far, you should have a directory in your Development/Src folder that looks somewhat like this (where SummerGame is replaced with the name of your project folder):

SS1

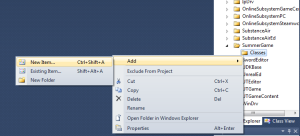
Right click on the Class folder in your folder that will contain all your code for your game, and select “Add New Item”, as shown below.

SS2

Create a new UnrealScript file and name it “<YourAcronym>_GameInfo”, replacing YourAcronym with an acronym that reflects your game (ie. if your game was called SummerGame a possible acronym would be SG so your file would be called SG_GameInfo).

Once you’ve created the UC file, you will be presented with a file empty except for the template of a UC file. What you want to do here, is change the extends class to GameInfo from the current extension Object. This will make your current class extend from the engine’s GameInfo class, giving your class the functionality of GameInfo but allowing you to override functionality where you want, as well as adding more functionality to your class.

The next thing you’ll want to do is go into the DefaultProperties section and add the following bits of code:

 DefaultPawnClass=class'SummerGame.SG_PlayerPawn'
PlayerControllerClass=Class'SummerGame.SG_PlayerController'
HUDType=class'SummerGame.SG_HUD'
bUseClassicHUD=true
bDelayedStart=true
bRestartLevel=false
bPauseable=true

Here is a short breakdown of what each line is doing. The first line sets the default pawn class to use in this particular game mode to the pawn class specified, for your purposes, I would name it PlayerPawn prefixed with your acronym like before. The pawn is basically the collection of meshes, animations, physics assets, materials, and properties that make up some type of actor. This could be the main character, an enemy, a neutral or anything else you can think of (keep in mind that you need to include the <YourSrcProjectFolder>.filename format, so that you reference the correct files in your Development/Src directory). Remember this file name. Do the same with PlayerController, this will contain the input logic behind the way a pawn is controlled. Remember this file name as well. The HUDType defines the scaleform object that we will use for in-game heads-up display. We’ll come back to this, for now you can choose to leave it blank. We want to set bUseClassicHUD to true so that the ‘classic’ HUD will be used, so when we choose to include the HUDType it will appear. We want to set bDelayedStart to true, this will prevent anything from happening when the level loads before we explicitly tell the game to spawn the player, if we set this to false, the player will spawn immediately once the level loads. We want to set bRestartLevel to false so that the world persists after we die, if this is set to true, everything is reset once the player dies, which could be useful if you are creating some type of puzzle game. The final thing to go over is bPauseable, setting this to true will allow the game to be paused.

So once you are done all that, you should end up with something that looks like this:

class SG_GameInfo extends GameInfo;

DefaultProperties
{
	DefaultPawnClass=class'SummerGame.SG_PlayerPawn'
	PlayerControllerClass=Class'SummerGame.SG_PlayerController'
	HUDType=class''

	bUseClassicHUD=true
	bDelayedStart=true
	bRestartLevel=false
	bPauseable=true
}

That’s good enough for now, we’ll come back to this file later. Next we will need to make our Pawn, PlayerPawn and PlayerController classes.

Setting Up Directories

So once UDK is installed, I personally like to set my directories up as follows. I’m sure there are better setups for directory organization but for this tutorial, I’ll be using the following.

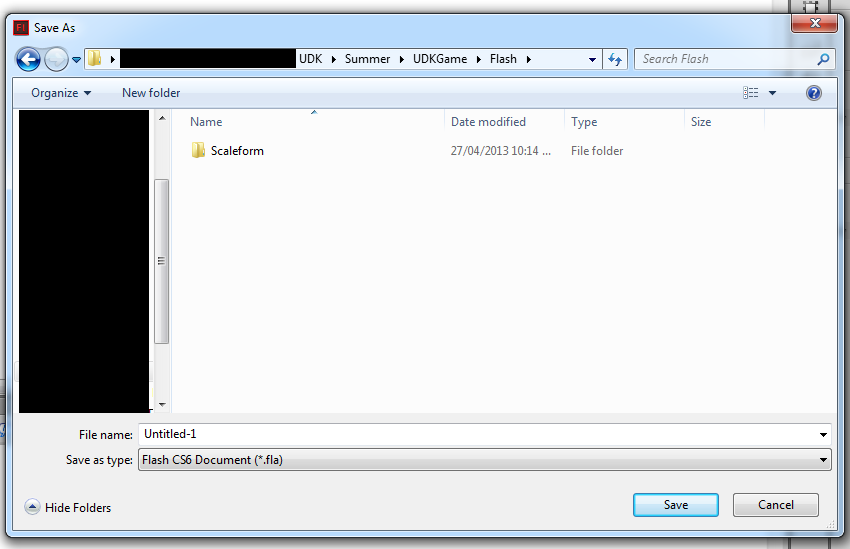
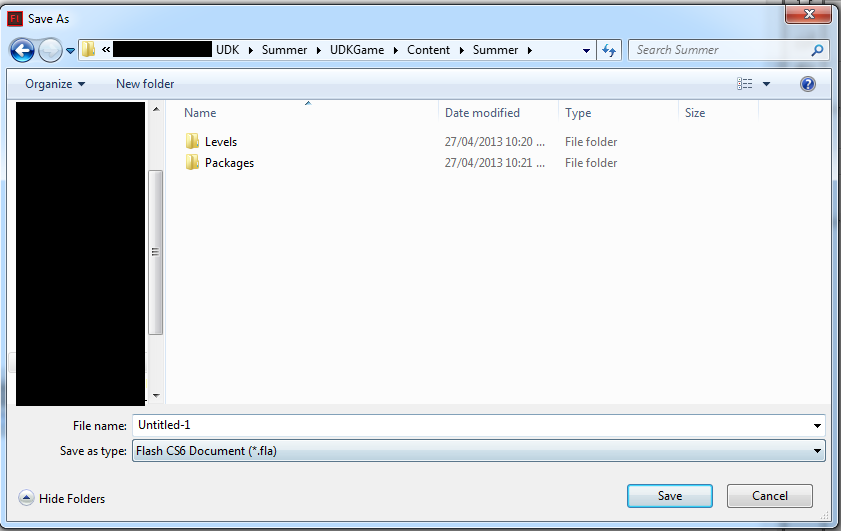
Go to UDK/<ProjectName>/UDKGame/ and create a new folder in there called Flash, this is where all the .fla files will be stored. Inside this folder, make a new folder called Scaleform, this is where the .swf output files will be stored.

DirectoryThe next thing we want to do is go into the UDK/<ProjectName>/UDKGame/Content directory and add a new folder called <ProjectName>, replacing ProjectName with whatever the name of your UDK project is. This will hold all assets specifically related to the project including .upk files and .udk levels. Inside this folder, create two folders: one called Levels and the other called Packages, .upk files will go into the Packages folder, and the .udk files will go into the Levels folder.

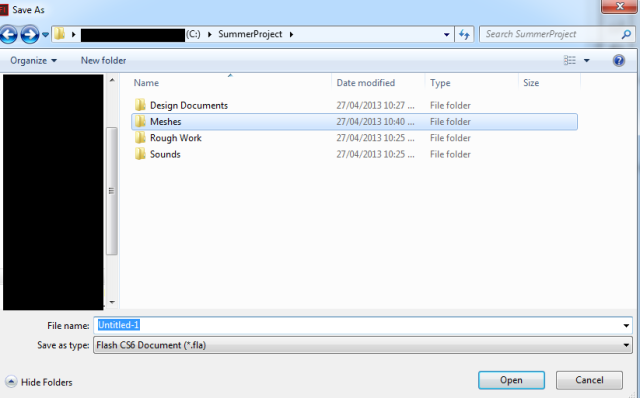
Directory2I would also suggest creating a folder outside of the UDK folder, possibly in the root drive where UDK is located, and name it your project name. In this folder, you could potentially create a bunch of folders to help manage your assets before they are imported into UDK as assets and stored in a package. For example:

You may not use the ‘design documents’ folder, however I use it when building a game from scratch, that way the idea can be traced back to its origin and system components can be documented for trace-ability as well as validation and verification of those components when compared to a requirements document.

The final thing to go over is your unrealscript directory. This will be located in your UDK/<ProjectName>/Development/Src folder, I would suggest making a new folder in this directory and naming it after your project or game name (without spaces). All your unrealscript classes will be located here, and will be built from this directory.

You may also want to consider using some type of repository system to keep versioning and tracking of files. Good ones to use are subversion or something like dropbox, however UDK also comes with a file management system called perforce (although I have very little experience using it). I recommend the use of tortoise to checkout your repository, however any other svn tool probably works just as well. This concludes the setting up of directories before I begin using UDK. Now its time to get to the good stuff.

Installing UDK

Installing UDK

Go to http://www.unrealengine.com/en/udk/downloads/ and download the latest release (at the time of this tutorial, the latest release was Feb 2013 UDK Beta).
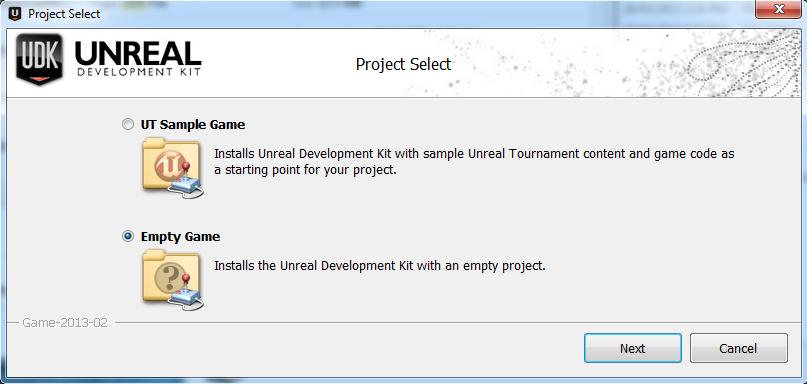
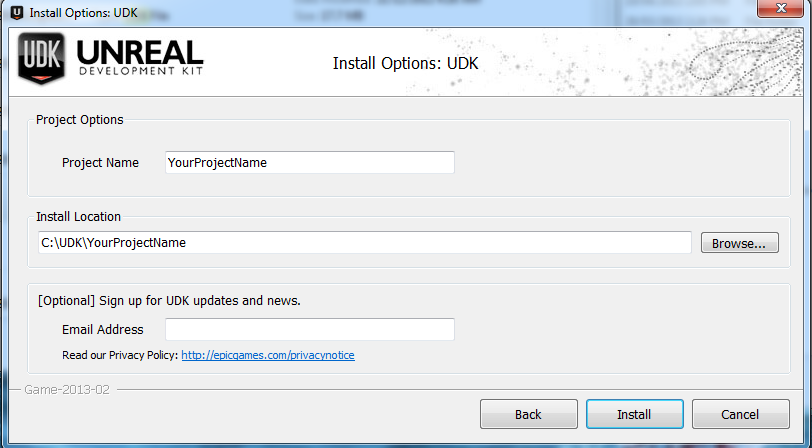
Once the download is complete, install UDK with the following options.

This will default to an empty project, removing all unnecessary code, meshes, sounds, and other content that a developer wouldn’t need if they are making a completely new game.
Replace YourProjectName with whatever you want to name your UDK project.

IMPORTANT NOTE:

I’ve tried compiling using this setup and apparently the newest release of UDK has a bug in it which presents compiler errors when extending classes from the UDKBase. To fix this, you need to go into your UDK/<ProjectName>/UDKGame/Config folder and open the file DefaultEngineUDK.ini and change the following:

[Engine.ScriptPackages]
+NativePackages=UDKBase
+NonNativePackages=SummerGame

Make sure that UDKBase is above your project name (where SummerGame would be replaced with your projectname). Also make sure that UDKBase is above your project name in the following section of the same file:

[UnrealEd.EditorEngine]
+EditPackages=UDKBase
+EditPackages=SummerGame
EditPackagesOutPath=..\..\UDKGame\Script
FRScriptOutputPath=..\..\UDKGame\ScriptFinalRelease
;ModEditPackages=MyMod
AutoSaveDir=..\..\UDKGame\Autosaves
InEditorGameURLOptions=?quickstart=1?numplay=1

Save this and you should not have compiler errors when extending from UDKBase.

So that’s the basics of setting up UDK. Now we will move onto setting up Scaleform, this is what is required for designing the HUD, menus and other widgets using Flash Scaleform integration.

Installing Scaleform

I believe you need Flash CS4 or higher for Scaleform to work with UDK, however I could be mistaken. For the purposes of this tutorial, I will assume you have Flash CS4 installed already.
Follow the steps in this link: http://udn.epicgames.com/Three/SettingUpScaleformGFx.html

Once these steps are done, you are now ready to make your game.

Coming Soon.

I’ll be posting things that I’ve documented over the course of my extensive usage of UDK over the past 6 months. It’s possible that the practices aren’t the best, but the purpose of this entire blog isn’t to show you “whats best”. Instead try to use the information I am providing here as a starting point for forming your own ideas, modules, and system components. I’ll be starting with Unreal Development Kit, however I may deviate from what I post every once in a while to something else that caught my attention (perhaps Flixel or Unity). Most of what I’ve gathered here from UDK has been information I’ve managed to scrounge together from other tutorials or message boards, however there may be some things you find here that end up helping you with smaller details that are harder to find. The implementations shown here are what I’ve put together and I am in no way advocating the use of the design as it may be poorly thought out, but surely you can build upon these ideas. Infact, if you know a better way to do something, tell me, as I am always eager to learn the right way to do things.

Hope this ends up being a useful site for anyone interested.